How to Make a Tech Pack: The New Black AI
Published 7 September 2026 · Updated 25 September 2026
To make a tech pack, you need five things in one document: a flat sketch of the garment with lettered callouts, a table of measurements with a size run and tolerances, a bill of materials, the colourways, and the construction and finishing notes. This guide walks through each step in the order a factory reads them, by hand or with AI drafting the first version, and ends with the checks that save a sample.
Before you start: what you need on the table
A photo or a drawing of the garment, front and back. The sample you are copying, if there is one. Your size chart, or the brand you are grading against. The fabric and trims you have chosen, with their references. And a style code, because a tech pack without one is a document nobody can file. If you are not sure what a tech pack is for, read what is a tech pack first; this guide assumes you know why you are writing one.
Step 1: open the header and name the style
Style name, style code, season, category, designer, date, version number. Version matters: the factory will receive this document three or four times, and version 3 must not be mistaken for version 1. In the tech pack studio the header is the first section of a new pack; every label can be renamed to match your own numbering.
Step 2: draw the flat sketch
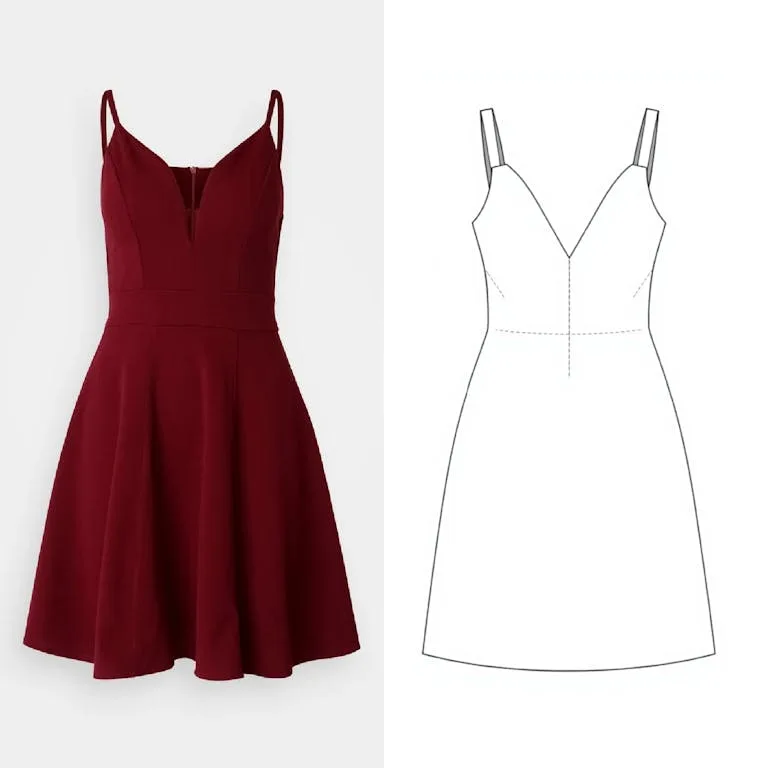
The flat is a technical drawing, front and back, flat on the page, no model, no perspective, no shading. It shows every seam, every pocket, every closure, every topstitch. Draw it yourself, or draw it from a photo: image to flat sketch turns a photo of the garment into a flat, and the tech pack studio does the same from inside the pack for one credit per sketch. Then place the callouts: a letter on every detail that will get a measurement or a construction note. A on the sketch is line A of the size chart.
Step 3: write the construction
Under the sketch, or on its own page, describe how the garment is made. Seam types and allowances, stitch density, topstitching width and thread, interfacing and where it goes, closures and their placement, hem finish, label placement. Write the sentence you would say on the phone if the factory called. Avoid "standard" and "as per sample": both mean something different in every factory.
Step 4: build the points of measure
One line per measurement, one column per size. Each line has a code that matches a callout on the sketch, a name that says exactly where the tape goes, a value for each size in the run, and a tolerance. Chest at one inch below the armhole, measured flat across, is a point of measure. "Chest" is not. Start from the sample size, then grade: the step between sizes for each measurement. Keep values as the factory will read them, in the unit you agreed, with fractions if that is how your workshop measures.
Step 5: list the bill of materials
Every component of the garment, one per line: shell fabric, lining, interfacing, thread, zip, buttons, drawcord, eyelets, main label, care label, hangtag, polybag. For each: supplier or reference, composition, weight, colour, placement, and consumption per garment. The bill of materials is what the factory prices and orders. The line you forget is the phone call you get at the worst moment.
Step 5b: put a cost next to the materials
Factories quote from the tech pack, so the bill of materials is also where the cost begins. Next to each material, a unit price and a consumption per garment; under the table, the labour estimate the factory gave you, and the target price you want to land. None of it is binding, all of it saves a round of emails: a factory that sees your target answers with a real quote instead of a question. In the tech pack studio, the bill of materials carries a Quantity and a Price column for exactly this.
Step 6: add the colourways
One column per colour the garment is produced in, every component that changes colour listed, with a reference the mill can match: Pantone, a lab dip number, a swatch photo. Two colourways with the same trims share the trims line; a colourway with a different zip gets its own.
Step 7: write the finish and packing notes
Wash and press instructions, folding, hanging or flat packing, label position on the bag, carton quantities, and anything that must not happen. This is the shortest section and the one most often missing.
Step 8: read it back like a factory, then export
Read the whole pack as if you had never seen the garment. Every callout on the sketch has a line in the table. Every line in the table has a tolerance. Every material has a reference. Every colourway has a code. In the tech pack studio, the AI review does this reading for two credits and lists the questions a factory would ask, which is cheaper than the sample that would have carried the answer. Then preview and export the PDF, the whole pack or a single page, portrait or landscape as each page needs.
Making a tech pack from photos with AI
If the garment exists, the fastest route is to start from photos. Start with AI reads the front and back photos and drafts the pack: the flat sketch, the construction description, a first bill of materials and a first set of measurements. It costs one credit for the draft plus one per sketch, and the draft is meant to be corrected, not signed. Check the measurements against the real sample, replace the guessed materials with your references, and keep the structure. A draft that takes ten minutes to correct is a document that took an afternoon to type.
After the sample: update the pack
The first sample comes back and the fit session changes three measurements and one seam. Write them back into the tech pack, bump the version, and send it again. A pack that is not updated after the fit will reproduce the mistake in production, and it will do so in every size.
Build your first tech pack
Open the tech pack studio: start blank, from photos, from an import or from a template, and export the PDF when the factory asks for it. Building by hand is free; the AI draft and the AI review draw on credits, and a new account opens with some.
Frequently asked questions
How long does it take to make a tech pack?+
By hand, a first tech pack for a simple garment takes two to four hours; a complex one, a day. With an AI draft from photos, the first version takes minutes and the correction under an hour.
What software do I need to make a tech pack?+
Any tool that gives you a canvas for the flat, tables for measurements and materials, and a PDF export. Spreadsheets work and are slow; a dedicated tech pack generator keeps the sketch and the tables in one document and lets the AI draft the first version.
How do I make a tech pack for a t-shirt?+
Front and back flat with callouts for body length, chest, hem, sleeve length and opening, neck width and depth, shoulder; a measurement table for those points across your sizes; a bill of materials with the jersey, the ribbing, the thread, the labels and the packaging; colourways; wash and packing notes. One page is enough.
Do I need CAD to make a tech pack?+
No. CAD makes patterns; the tech pack describes the garment for the factory, which makes the pattern from it. A flat sketch, drawn or generated, is all the drawing a tech pack needs.
Is there a free tech pack template?+
Yes. The tech pack studio opens on a template: header, flat sketch page, points of measure, bill of materials, colourways and notes, with every label renamable. Building by hand on it is free; export to PDF when the factory asks.
Can AI make a tech pack from a picture?+
Yes. From front and back photos, the AI drafts the flat sketch, the construction, a first bill of materials and a first set of measurements. You correct the draft against the real garment and export.
Related articles
- Tech pack designer vs AI: The New Black AIHire a tech pack designer or make your tech pack with AI? What each delivers, what it costs, how long it takes, and how small fashion brands combine the two.
- How to Design a Dress with AI: The New Black AIDesign a dress with AI step by step: the order of the description, three prompts for three dresses, then colourways, fabrics, a model, a video and the tech pack from the same design, with the credits.
- Cost to Start a Clothing Brand: The New Black AIWhat it costs to start a clothing brand in 2026: budgets by model, every line from samples to photos, and what the design, tech pack and photo work costs with AI.
- Clothing Design Software: The New Black AIClothing design software explained: the five kinds of fashion design software, what each one does, how to choose, and where AI design tools fit from concept to tech pack.
- How to Make a Fashion Lookbook: The New Black AIHow to make a fashion lookbook in 7 steps: who it is for, editing the looks, one visual direction, shooting or generating, layout, words, and publishing a digital lookbook.
- Clothing mockup generator with AI: The New Black AIMake clothing mockups with AI: your logo or print set into the fabric, following its folds, then worn by a model, as a ghost mannequin or flat lay. 1 credit a step.
- Best AI Virtual Try-On Tools 2026: The New Black AIEleven AI virtual try-on tools compared for brands and for shoppers: free tier, first plan, shoes and jewellery, video try-on, Shopify, prices read on 25 September 2026, and which one for which need.
- Best AI Fashion Video Generators 2026: The New Black AIEight AI fashion video generators compared: what each starts from, the clips it makes, length and resolution, the price of a ten-second clip read on 25 September 2026, and where the video goes.
- AI Fashion Design Guide 2026: The New Black AIWhat AI fashion design is, how it works in five stages, AI versus traditional design phase by phase, the eight capabilities, what it costs, where it falls short, and six steps to start.
- Best AI Fashion Design Software 2026: The New Black AI24 AI fashion tools compared, updated 25 September 2026: free tiers and first plans side by side, prices read that day, what each is built for, which fits a brand, a designer or a Shopify store.